Showing posts with label Basics. Show all posts

Friday, October 11, 2024

Tomato-Basil Soup

This has become a classic soup during my lifetime. I recall when La Madeleine restaurants in Dallas served it to rave comments, sold it bottled at grocery stores, and yet ... I never tried it.

I love regular Tomato Soup and though I believed the accolades I just didn't think I needed to eat Tomato Soup that often. It turns out I was wrong.

Rose came across it when living in L.A. and immediately found a recipe which she made regularly. She's been back in Dallas for years now, living at home, and it has become a staple for our meatless Friday meals. We love it, especially paired with a Grilled Jalapeño Jack Cheese Sandwich.

As my husband observed, "I always just thought I didn't like Tomato Soup before. Turns out I was eating the wrong soup!"

It helps that it is super easy.

Note: this freezes well and we often make a double recipe so that there's always some on hand.

Tomato-Basil Soup

Step 1:
3 tablespoons olive oil
2 red onions, chopped
3 cloves garlic, minced

Heat olive oil over medium-low heat in a dutch oven or large pot. Once hot, add onions and season generously with salt. Cook the onions, stirring occasionally, until soft and starting to turn golden brown, about 15 minutes. Add the garlic and cook for 1 more minute, stirring to avoid burning the garlic.

Step 2:
1 (28-ounce) can crushed tomatoes
4 cups good-quality chicken stock
Salt and pepper

Stir in the tomatoes and chicken stock. Season generously with salt and freshly ground black pepper. Bring the soup to a boil, then lower heat to maintain a simmer for at least 15 minutes. Feel free to leave it longer if you forget about it.

Purée mixture using an immersion blender or carefully transfer soup to a blender and blend until smooth. If using a blender, return mixture to the pot.

Step 3:
1 cup heavy cream
1 bunch basil, torn into small bite-size pieces
Parmesan cheese, grated for garnish

Stir in the cream and basil and let simmer for at least 15 minutes or until preferred consistency. Serve immediately, topped with a sprinkling of Parmesan cheese, black pepper, and basil.

Friday, September 27, 2024

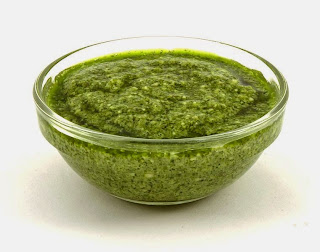
Pesto alla Genovese

I first posted this in 2015. Clearly it is time to share it again! It is a family favorite and without fail I plant basil every spring so that I can harvest it throughout the year for this Pesto.

Pesto alla Genovese
(a.k.a. Basil, Garlic and Cheese Sauce)
via Wikipedia

The Time-Life Foods of the World books gave my family many favorites that were exotic in the 1960s but are standard now. So when Rose asked for our pesto recipe I knew The Cooking of Italy was the place to turn. You'll see many variations in different cookbooks but none are better than this.

It freezes well and that's a good thing because the July Texas sun turns my basil plants into monsters that have me making pesto once a week. The harvest keeps going into the fall.

This recipe gives techniques for the blender (this was before food processors which is what I use) and the old fashioned mortar and pestle. I'll just leave that technique out because if someone is using those then they've already got a recipe. And they're more dedicated to authenticity than I'll ever be.

Pesto alla Genovese

Makes about 1-1/2 to 2 cups

2 cups fresh basil leaves, stripped from their stems, coarsely chopped and tightly packed
1 teaspoon salt
1/2 teaspoon freshly ground black pepper
1 to 2 teaspoons finely chopped garlic
2 tablespoons finely chopped pine nuts or walnuts
1 to 1-1/2 cups olive oil
1/2 cup freshly grated imported sardo, romano, or Parmesan cheese

Combine the coarsely chopped fresh basil, salt, pepper, garlic, nuts, and 1 cup of olive oil in the blender jar. Blend them at high speed until the ingredients are smooth, stopping the blender every 5 or 6 seconds to push the herbs down with a rubber spatula.

The sauce should be thin enough to run off the spatula easily. If it seems too thick, blend in as much as 1/2 cup more olive oil. Transfer the sauce to a bowl and stir in the grated cheese.

Friday, September 20, 2024

Best Sloppy Joes

Here's a well loved family favorite which my 90-year-old mother immediately took to when she moved in with us.

I am not positive but believe this recipe came from Gourmet in the letters from readers section quite a long time ago. I skip the chopped onion when I am especially pressed for time.

Enjoy!

Step 1:

1 pound extra-lean ground beef
1/2 cup chopped onion

Sauté beef and onion until meat is no longer pink. Drain fat.


Step 2:

1 cup ketchup
2 teaspoons dark brown sugar
2 teaspoons white vinegar
2 teaspoons lemon juice
1 tablespoon Worcestershire
1 teaspoon Dijon
Pepper to taste
4 burger buns

Add all and cook, uncovered, over low heat, stirring occasionally, until thickened, about 10 minutes. Pop on the buns and enjoy!

Thursday, March 28, 2024

It's the Simple Things in Life That Matter — Perfect Piecrust

Another rerun - from 2004.

Yes, you heard me ... pie crust. Its always a touchy subject among cooks and I can't blame anyone for using the pre-made ones in the red box (Pillsbury?). I have to admit they really are the best commercial alternative to homemade.

However, this recipe is the easiest and most foolproof I've ever found. Once when Rose was making it, she accidentally added an extra 1/4 cup of water and wound up with something like a thick batter. We improvised by sprinkling extra flour in until it looked right and ... voila! A delicious, flaky pie crust with no problem. Now that's hard to beat.

It is from The Man Who Ate Everything by Jeffry Steingarten. Marion Cunningham, baker extraordinaire, made about a zillion pie crusts while detailing every step along the way so Steingarten could get it just right. The beauty of it is that this makes a lot more dough than you need so you don't have to worry about scrimping to get the crust just perfect when rolling it out.

It looks intimidating but that's because it details every step needed. It's always been perfect from the first time pie to the most recent.

PERFECT PIECRUST

Step 1:
3 cups flour (scoop with 1-cup measure, press it very lightly into the cup and level off excess with side of hand)
2 teaspoons sugar
1 teaspoon salt
1-1/2 cups shortening (Crisco, butter, or a combination)

In a large bowl mix flour, sugar, and salt with fingers. Drop shortening onto flour in bowl. Toss with flour, then break up into about 12 nuggets, tossing gently to coat and arrange on flour in a rough circle. Rub fat into flour in two stages.

Step 2:
First, scoop fingers of both hands down along the sides and bottom of bowl under flour and lift them several inches above rim of bowl with a pile of flour and one large chunk of fat in each. Lightly rub thumbs back and forth across fingertips, about three times, in order to break up into pieces the size of small olives while coating with flour. Do not press down hard with thumbs; do not flatten fat. Roll it between fingertips. Let flour and fat fall back into bowl. Repeat five times, until all large nuggets are broken up.

Step 3:
In second stage, continue scooping up flour and fat from bottom of bowl, sweeping thumbs only once and only in one direction, from little finger to index finger. Smallest pieces will slip between fingers and largest pieces will tumble over index finger. Repeat 20-25 times. Particles of flour-coated fat will range in size from coarse meal to peas to small olives. It is important that particles range widely in size. A little flour may remain uncoated.

Step 4:
3/4 cup very cold water
1 tablespoon cold milk for brushing the pie
1 tablespoon sugar for sprinkling crust

Add 1/2 cup of cold water, sprinkling evenly over the surface. Immediately stir water into flour with fork, held vertically, starting at sides of bowl, then stirring in smaller and smaller circles toward center, making sure that the points of the fork sweep the bottom of the bowl. Motions should be light. After a few stirs, all the flour should be moistened and dough gathered into small clumps. If there are too many loose, dry crumbs, add a tablespoon or two of water and stir again. Do not overmix.

Step 5:
Gather all dough by pressing it together firmly against one side of the bowl. Break off about half, shape into a bowl with cool fingertips, and flatten it on the counter into a disk about an inch high. Repeat with other half of dough.

Step 6:
Grease a 9" pie plate with a tablespoon of shortening. Both crusts may be immediately rolled out or wrap each disk in plastic and refrigerate for 15-20 minutes. If refrigerated, dough will require 5-10 minutes at room temperature before becoming malleable; it should not break at edges when you roll it out. It must be refrigerated if dough contains butter.

Step 7:
To roll: On a well-floured surface roll the larger of the two disks into a rough 13" circle, 1/8" thick. Use a light touch, rolling from the center to the far edge, being careful to life to pin before flattening the far edge. Roll toward you in the same manner. Turn the dough an eighth or a quarter of the way round and roll again. Do not compress downward but stretch outward. Fold the circle gently into quarters in place in pan, placing the point of dough at the center. Unfold and trim. Cover with plastic wrap. Repeat with other disk. Unless kitchen is cool and dough is firm, cover with more plastic wrap and refrigerate for 10-15 minutes.

Step 8:
Prepare filling, fill, and when pie is sealed brush with milk and sprinkle with sugar. Set on cookie sheet and bake as per filling dictates. For a fruit pie, bake at 450° for 25-40 minutes until darkest spots on crust are very dark brown. Reduce heat to 375° and continue baking until it has been in the oven for a total of about 1 hour.

Thursday, March 07, 2024

Baked Salmon with Horseradish Mayonnaise

I first shared this in 2005 and it is well worth sharing again. It's one of my all time favorite recipes and really the only way that I make salmon. I've tweaked it a bit. It came from a diabetic cookbook, which is hard to believe considering how delicious it is.

Step 1:
1 salmon fillet (1 pound total), room temperature, cut into 4 pieces
Salt and pepper
Olive Oil
Brush salmon with oil and season. Bake at 475° on a lightly oiled, foil-lined cookie sheet. Bake exactly 5 minutes, then turn salmon over and bake another 5 minutes.

Step 2:
1/4 cup mayonnaise
2 teaspoons lemon juice
2-3 teaspoons horseradish
2 teaspoons drained capers
Whisk together. Top each serving of salmon with a heaping tablespoon of sauce.

Thursday, February 29, 2024

Mom's Creamed Tuna

First published here in 2005, it's time for a reprint! Especially during Lent!

I don't know where my mother got this recipe but it is the touch of nutmeg and the walnuts that make it shine. I often leave the nuts out so don't let those stop you in making this. It was one of our favorites growing up and my kids love it too.

Step 1:
2 tablespoons shortening
2 tablespoons flour
1 teaspoon dry mustard
1/8 teaspoon nutmeg
1 teaspoon Worcestershire
2 dashes Tabasco
2 cups milk
Make a white sauce. Stir over low heat until thickened. (For instructions on making a white sauce, take a look at the recipe for Pasta Baked with Bechamel and Parmigiano ... bechamel is Italian for white sauce.)

Step 2:
1/4 cup grated Parmesan
12 ounces tuna
Sautéed sliced mushrooms (optional)
1/3 cup broken walnuts (optional)
Add cheese, stir until melted. Add remaining and heat to serving temperature. Serve over rice or noodles.

Monday, January 24, 2022

Oven-Fried Chicken

I've made this so long that I no longer remember where I got it. It's easy and delicious and has become our family standard. I can't believe I haven't included it here before now. 

Once you're used to the basic recipe, play around with adding a teaspoon or two of spices or spice blends. You really can't go wrong.

OVEN-FRIED CHICKEN
Whole chicken, cut up OR 6-8 chicken pieces as desired
1 cup flour
1 teaspoon salt
1/4 teaspoon pepper
Additional seasoning or dried herbs, if desired
1/4 cup (4 tablespoons) butter, melted or room temp

Preheat oven to 350°. Mix the flour, salt, and pepper together and put in a bowl or shallow pan for dredging. (I use a pie pan.)

Dredge chicken in seasoned flour and arrange skin side up, 1 layer deep, on rimmed baking sheet. Brush butter onto skin. Bake, uncovered, 1 hour or so until fork tender and browned.

Tuesday, August 03, 2021

Chicken Tortilla Soup

Goodness gracious, I first shared this recipe in 2004. That is so long ago! In the meantime, I've made a number of time-saving changes or those that up the flavor. This soup is so simple and so delicious you've got to try it so I'm rerunning it, revised.

Chicken Tortilla Soup

Step 1:
1-1/2 - 2 pounds chicken thighs
6 cups chicken stock

Simmer the chicken thighs in the broth until done. Let cool on a plate and then discard skin. Pull meat off the bone in bite sized pieces. This enriches the broth and gives good moist chicken that will stand up to the later simmering. Reserve broth and chicken.

Step 2:
2 tablespoons vegetable oil
6 cloves garlic, minced
1/2 cup cilantro, chopped
1 onion, chopped
2-3 tomatoes, chopped (app. 2 cups)
OR instead of the above use 2 cups fresh pico de gallo from your grocery store (if your grocery store does that)

In a large stock pot, heat oil. Saute everything for about 10 minutes.

Step 3:
2 tablespoons cumin
2 tablespoons chili powder (I've also used ancho chili powder, which my husband loves in this dish)
1 teaspoon salt
Reserved chicken and broth from Step 1

Add all, return to a boil, reduce heat and simmer for 15 minutes. Serve up in big bowls to make room for accompaniments below.

Step 4:
Lime wedges
Shredded Monterey Jack
Sour Cream
Tortilla chips

Crumble some tortilla chips in the bottom of the bowl (or let each person add their own at the table), ladle soup over them. Serve with accompaniments.

Friday, January 25, 2019

Shepherd's Pie

This is from Cooking for Friends by Gordon Ramsay. Rose is a Gordon Ramsay fan and after sampling the many recipes she's made for us, I can see why. This Shepherd's Pie is a great example. It is still a simple dish but has been elevated beyond the regular Shepherd's Pies I've tried in the past, which, to be fair, never seemed that great. This one is great and will make you and your family very happy.


Shepherd's Pie

1 pound ground lamb or beef
1 large onion, finely chopped
1 large carrot, finely chopped
2 garlic cloves, finely chopped
2 tablespoons flour
1 tablespoon tomato paste
1 cup red wine
1.5 cups chicken stock
2 tablespoons Worcestershire Sauce
2 pounds baking potatoes
4 tablespoons butter
2 tablespoons hot milk
4 tablespoons Parmesan
2 egg yolks

1. Heat a large pan over medium-high heat. Season the ground meat with salt and pepper and fry in a thin layer of oil until evenly browned, about 10 minutes. Transfer the meat to a bowl using a slotted spoon.

2. Add more oil to the pan and stir in the onion, carrot, and garlic. Fry, stirring frequently, until the vegetables are golden brown, 4-5 minutes. Add the flour and tomato paste and stir for a couple of minutes longer. Pour in the red wine and scrape the bottom of the pan to dislodge the browned sediment. Let the wine boil until it has almost all evaporated and the pan is quite dry.

3. Pour the chicken stock and bring to a simmer. Return the meat to the pan and add the Worcestershire sauce. Turn the heat to the lowest setting and partially cover the pan. Simmer, stirring every once in a while, until the meat is tender and the sauce has thickened, 30-40 minutes.

4. Preheat the oven to 350 F. Meanwhile, cook the chunks of potatoes in boiling salted water until tender when pierced with a small knife, 15-20 minutes. Drain well, then mash with butter, hot milk, Parmesan, and egg yolks. Season to taste and set aside.

5. Pour the lamb or beef mixture into an 8 cup baking dish. Spoon the mashed potato on top. Bake until top is golden brown and the filling is bubbling up around the sides, 20-25 minutes.

Wednesday, October 03, 2018

Gingersnaps

These are from "Cookies Unlimited" by Nick Malgieri. It is a simply wonderful cookbook and we've never made anything that didn't work or that we didn't like. Considering how many recipes we've tried, that's an impressive record.

This was the first recipe I made and the one that made me buy the book. These are classic crisp, spicy gingersnaps truly worthy of the "snap" in their name. Simple and delicious.

Gingersnaps

Makes about 40 cookies

2 cups all-purpose flour
2 teaspoons baking soda
1/2 teaspoon salt
2 teaspoons ground ginger
1 teaspoon ground cinnamon
1/2 teaspoon ground cloves
12 tablespoons (1-1/2 sticks) unsalted butter
1 cup sugar, plus 1/2 cup for finishing
1 large egg
1/4 cup molasses

1. Set the racks in the upper and lower thirds of the oven and preheat to 350 degrees.

2. Combine the flour, baking soda, salt and spices in a bowl; stir well to mix.

3. In the bowl of a standing electric mixer fitted with the paddle attachment, beat together on medium speed the butter and 1 cup sugar for about 5 minutes until very light, fluffy and whitened. Add the egg and continue beating until smooth.

4. Lower the speed and beat in half the dry ingredients, then the molasses. Stop the mixer and scrape down the bowl and beater. Beat in the remaining dry ingredients.

5. Remove the bowl from the mixer and use a large rubber spatula to finish mixing the dough.

6. Place the remaining 1/2 cup sugar in a shallow bowl.

7. Use a small ice cream scoop to form 1-inch-diameter pieces of dough. Roll the pieces into balls between the palms of your hands, then roll them in the sugar. Place the balls of dough on the prepared pans, leaving about 3 inches all around each, to allow for spreading.

Wednesday, October 12, 2016

Poached Chicken

From Rick Bayless's Mexican Kitchen. This turned out some of the tenderest, juiciest chicken I've ever had. It's a great technique for a lightly flavored broth as well as chicken to use in various recipes.

Poached Chicken
Makes about 1-1/2 pounds poached chicken, about 3 cups shredded. 

1 medium white onion, sliced
2 garlic cloves, peeled and roughly chopped
1 teaspoon salt
1 good size (3 pound) chicken, cut into quarters (I used a 5 pound chicken, came out great with same timing)
2 bay leaves
1/4 teaspoon dried marjoram (didn't have it, didn't miss it)

In a large (6-quart) pot, bring 8 cups of water to a boil. (I used 10 cups because of the larger chicken.) Add onion, garlic, carrot, salt and chicken back (if you're lucky enough to have a separated one - I did because I cut up a whole chicken myself), neck, heart and giblets.

Skim off any foam that rises after a minute or two, partially cover and simmer over medium-low for 20 minutes.

Add dark meat quarters, skim again after a couple of minutes, then add bay and marjoram; partially cover and cook over medium heat for 10 minutes.

Add breast quarters, skim when the liquid returns to the simmer; partially cover and cook 13 minutes. Remove pot form heat and let chicken cool for a few minutes in the broth.

Remove breast and leg quarters from broth and set aside Strain broth, discarding solids and spoon off any fat that rises to the top. (Refrigerate broth covered, for up to 5 days or freeze it for up to 3 months. Wait until then to remove fat which will have solidified.)

When the chicken quarters are cool, pull meat off bones in coarse shreds. Meat will keep covered and refrigerated for several days or frozen for a few weeks.

Wednesday, August 03, 2016

Texas Hash

Anyone who didn't grow up in Texas is going to think of something like Corned Beef Hash and say, "What? Hash has chopped potatoes." But in Texas, it has rice instead. And ground beef. And a Mexican flair, if you are lucky.

After being introduced to the Davis family Texas Hash, I tried began adapting it for our family's preferences.

Delicious!

Texas Hash
1 pound good store bought Chorizo
1 medium onion, chopped
2 garlic cloves, minced (or use 1 cup pico de gallo instead of garlic and the tomatoes below)
2 small tomatoes, preferably Roma, chopped (or canned, diced tomatoes)
1-3/4 cup uncooked rice
1/2 tablespoon chili powder
1/4 teaspoon cumin
2 cups chicken stock
2 tablespoons chopped cilantro

In a large oven-proof skillet, preferably cast iron, brown chorizo over medium heat, breaking it into small pieces. Pour off the accumulated fat as necessary to leave no more than about 1 tablespoon.

Add the onion, garlic, and tomatoes to the chorizo and continue cooking, stirring occasionally, until the vegetables are limp and somewhat tender.

Add the rice, chili powder, and cumin, and cook another 5 minutes, stirring frequently. Pour in the stock, bring to a simmer, cover and cook 20-30 minutes, or until the liquid is absorbed and the rice is tender.

Stir in the cilantro. Serve immediately.

Tuesday, July 19, 2016

Favorite Meat Loaf

I've never been a meat loaf fan but for some obscure reason I tried recipe after recipe looking for one I could love. When I came across this in James Beard's American Cookery, I knew I'd found my meat loaf at last. For one thing, it is covered in bacon. For another, it has strong seasoning anchored by sausage. For the third thing ... did I mention the bacon?

Another advantage is that you shape the loaf without putting it in a loaf pan. That means it isn't soggy because the fat has somewhere else to go than soaking into the loaf. That makes the texture nice and firm.

It is the meat loaf I cooked for my family winter after winter and I really love it.


Favorite Meat Loaf

2 pounds ground beef
1 pound ground pork (sausage meat will do)
2 garlic cloves, finely chopped
1 fairly large onion, finely chopped
1-1/2 teaspoons salt
1 teaspoon freshly ground pepper
1 teaspoon thyme
1 teaspoon summer savory (I never have this on hand and it works fine without it)
1/2 cup dry breadcrumbs
2 eggs, lightly beaten
Bacon or salt pork cut in strips

Thoroughly blend the meats, garlic, onion, seasonings, and crumbs.

Add the eggs and blend again.

Arrange the bacon or salt pork slices on the bottom of a shallow baking pan or dish 1 to 1-1/2 inches deep. (I use a jelly roll pan.)

Form the meat into a loaf of rather even proportions and lay it upon the strips. Lay a few additional strips of bacon or pork across the top of the loaf. Bake at 350 degrees 1 to 1-1/2 hours.

Test with a meat thermometer, and when its center has reached 150 degrees it is done.

The recipe says to baste, but that's what the bacon on top is for. Am I right? Of course I am!

Saturday, August 22, 2015

Chocolate Buttercream Frosting

From The Cake Mix Doctor which has some really terrific frosting recipes. Never, ever use frosting from a can.

Chocolate Buttercream Frosting

8 tablespoons butter, room temperature
2/3 cup unsweetened cocoa powder
3 cups powdered sugar
1/3 cup milk
2 teaspoons vanilla
1/4 teaspoons salt

Beat the butter and cocoa powder until well combined. Add remaining ingredients and beat until frosting lightens and is fluffy. Add additional milk or sugar if necessary to achieve desired consistency.

Friday, October 03, 2014

Spicy Sausage Ragu

I really love the cookbook Pasta by Eric Treuille. The recipes are simple yet deeply flavorful. Every time I've made anything from it there is always just a little twist that helps it stand out from any similar pasta dish.

This recipe is a case in point. It seems like a simple pasta sauce and yet it is smoothly spicy in a way that we quickly became addicted to.

The only change I made was to double the meat. This was simply because I wanted to use up the entire 16-ounce package of Italian sausage, which was the only size available at the particular store I was at. It wasn't an overpowering presence, possibly because the sausage itself was fairly mild. We liked it that way so I left that possibility in the recipe.

Spicy Sausage Ragu

Step 1

3 tablespoons olive oil
1 onion, finely chopped
2 garlic cloves, minced

Heat oil in a skillet. Cook onion and garlic over medium high heat, stirring frequently, unstil soft and pale gold, 5 minutes.

Step 2

8-16 ounces Italian sausages, casings removed and crumbled
1/2 teaspoon crushed red pepper flakes
1 teaspoon fennel seeds (or 1/2 teaspoon ground fennel)
1 teaspoon oregano
1 tablespoon tomato paste
1 14-ounce can chopped Italian plum tomatoes

Add sausage. Cook, stirring to break up, until browned, 10 minutes. Add all remaining. Simmer, stirring occasionally, until thickened, 20 minutes.

Step 3

2/3 cup heavy cream
Salt, pepper

Add cream. Cook, stirring until heated through. Add salt and pepper to taste.

Step 4

1 pound dried pasta
Freshly grated Parmesan to serve

Meanwhile, cook pasta in a large pot of boiling, salted water, until firm to the bite. Drain. Add pasta to the hot sauce. Toss well to coat. Serve immediately with Parmesan. Serves 4-6.

Notes
You can make the sauce up to 3 days ahead and refrigerate. Or freeze it up to a month. Defrost overnight in fridge.

Friday, May 23, 2014

Mom's New York Cheesecake

My very favorite. The one I always requested for birthdays when I was growing up.

And I can't believe I never shared it with y'all! Well, that is now remedied. Enjoy!

Mom's New York Cheesecake


Step 1:
1/2 cup butter, softened
1/4 cup sugar
1 egg yolk
1cup sifted flour
1/4 teaspoon lemon rind
1/4 teaspoon vanilla

Make the crust: Preheat oven to 400°. Cream butter and sugar, add egg yolk. Then add other ingredients. Pat 1/3 of dough in bottom of springform pan. Cook for 6 minutes, cool completely. Meanwhile, raise oven temperature to 475°. Butter sides of pan and put remaining dough around the sides of the pan. Crust will only come up 1/3 of the sides of the pan.

Step 2:
2-1/2 pounds cream cheese
5 eggs
3 tablespoons flour
1-3/4 cups sugar
1 lemon rind
1/4 teaspoon vanilla
1/4 teaspoon salt
2 egg yolks
1/4 cup cream

Make the filling: Beat cream cheese until soft. Mix in all remaining ingredients. Pour filling into crust.

Bake at 475° for 7 minutes, lower temperature to 200° for 2½ hours. Turn off oven and let cake sit in oven with the door slightly ajar for 30 minutes. Remove from oven and let cool, refrigerate overnight.

Monday, November 25, 2013

Sweet Potato Casserole With Pecan Crumble

What?

I didn't share this recipe from Saveur which we tried out for Thanksgiving in 2011? Shame on me. It is simply delicious, just sweet enough to enhance the sweet potato flavor without obscuring it. Until Rose, far from home and providing the basis of Thanksgiving dinner for her friends, asked me about it yesterday I didn't realize I'd not put it on the blog.

Note: I skipped the mini marshmallows, not being a marshmallow appreciator.

Also, I feel positive that I make this to the point of adding the crumble and then refrigerate it until the next day, Thanksgiving, when I let it come to room temperature and bake it while the turkey is resting. That's my story and I'm sticking with it.

Sweet Potato Casserole With Pecan Crumble

Step 1:
3 pounds sweet potatoes

Heat oven to 425°. Place sweet potatoes on a parchment paper-lined baking sheet and bake until soft, about 1-1/2 hours; let cool for 30 minutes, and then remove skins. Pass potatoes through a food mill into a large bowl.

Step 2:
1/3 cup packed dark brown sugar
6 tablespoons unsalted butter, melted
1/4 cup heavy cream
1 teaspoon vanilla extract
1 teaspoon ground cinnamon
1/2 teaspoon freshly grated nutmeg
1/2 teaspoon kosher salt
2 eggs, lightly beaten
1 1-inch piece ginger, finely grated
Freshly ground black pepper, to taste

Stir in sugar, butter, cream, vanilla, cinnamon, nutmeg, salt, eggs, ginger, and pepper. Pour mixture into a 1½-quart baking dish and smooth top; set aside.

Step 3:
1/2 cup flour
1/2 cup rolled oats
1/2 cup packed dark brown sugar
1/4 cup finely chopped pecans
1/2 teaspoons kosher salt
5 tablespoons unsalted butter, cubed and chilled
1/4 cup mini marshmallows

Reduce oven temperature to 350°. Stir together flour, oats, sugar, pecans, and salt in a bowl; add butter and, using your fingers, rub butter into flour mixture until large crumbles form. Mound crumble mixture over filling, dot with marshmallows, and bake until filling is hot and crumble and marshmallows are browned, about 30 minutes. Let cool for 15 minutes before serving. Serves 6-8.

Thursday, September 19, 2013

Quick Asian-Style Dumpling Soup

This came from Cook's Country magazine, which I actually prefer quite a bit to Cook's Illustrated, though both tend to go on and on about how they got to their eventual recipe. C'est la vie. One can easily skim or skip and see what the darned recipe looks like.

An exception to this tendency is the eight recipes that are always on cardstock in the middle of the publication, perforated so one can easily detach them and have a ready made recipe card with picture on one side and recipe on the other.

I'm a sucker for Asian soups of all sorts and this one looked tempting with dumplings, green onions, and mushrooms poised in the bowl of broth. My one fear was that it wasn't hearty enough for a main dish.

This recipe delivered on both flavor and filling ability, especially when accompanied by a baguette and salad (dressed with Balsamic Vinaigrette). I made a half recipe for the two of us which was a hearty meal. I think next time I'll make a full recipe up to the point of adding the dumplings, saving half the soup base for adding dumplings a second evening.

I'll be making this one again, definitely.

Quick Asian-Style Dumpling Soup

Serves 4

4 slices bacon, cut into 1/2-inch pieces
3 scallions, white and green parts separated, sliced thin on bias
2 teaspoons grated fresh ginger
1/4 teaspoon red pepper flakes
4 ounces shiitake mushrooms, stemmed and sliced thin (I used regular mushrooms, so sue me)
6 cups chicken broth
16 ounces frozen Asian-style dumplings or potstickers
2 tablespoons fish sauce
2 tablespoons lime juice

Cook bacon in large saucepan over medium heat until crisp, 6 to 8 minutes. Using slotted spoon, transfer bacon to paper towel-lined plate. Pour off all but 2 tablespoons fat from pan and return pan to medium heat. (Conversely, if you don't have 2 tablespoons of fat, then add vegetable oil to achieve that measurement.)

Add scallion whites, ginger, and pepper flakes and cook until scallion whites have softened, about 2 minutes.

Add mushrooms and cook until beginning to brown, about 5 minutes.

Add broth and bring to boil.

Add dumplings and simmer over medium-low heat until dumplings are cooked through, 10 to 15 minutes.

Remove from heat and stir in fish sauce and lime juice.

Serve, sprinkled with scallion greens and bacon.

Monday, December 10, 2012

Oven "Fried" Catfish

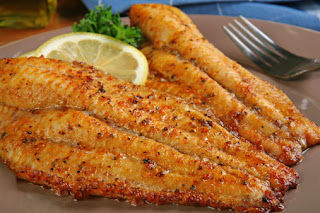
This is a stock photo (so handy working in advertising!),
but it is close enough to showing the succulence
of Oven Fried Catfish.
Rose, living in L.A. since last January, called and wistfully said, "I know what I want for Christmas."

I waited expectantly and was surprised when she said, "Catfish."

"Oh, I mean what I want for meals when I come home." she said. "Catfish fried in the oven."

"Mmmm, sounds good. Potato salad or mashed potatoes with that?"

"Ooooo." Her voice got more excited. "Potato salad! And maybe, well, is cabbage a cold weather vegetable?"

"Why do you think the Germans and Russians have so many cabbage dishes?" I asked. "Cold weather is what cabbage is all about."

"Then coleslaw too! And potato rolls?"

"I have extra in the freezer from Thanksgiving that I'm saving until you come home. So we're on our way!"

Sounds good, doesn't it? I just realized that I never put the recipe here. If you're not making some variation of this then you need to give this a try because it is simple, quick, and delicious. As we can tell from the fact that kids coming home ask for it.

I got it from Mark Bittman's How to Cook Everything. He calls it Oven "Fried" Fish but I never make it with anything but catfish.

Oven "Fried" Catfish

1-1/2 pounds catfish filets
1-1/2 cups milk, buttermilk or yogurt (I use milk)
Bread crumbs for dredging (dried, fresh, whichever you wish)
Salt and freshly ground black pepper (I'll often use other seasoning)
3 tablespoons melted butter or virgin olive oil (I use olive oil)

Soak the filets in the milk while you preheat the oven to 450°.  Put the bread crumbs on a plate and sprinkle with salt and pepper.

When the oven is ready, pull the fish from the milk and let it drain a bit. Dredge wet fish in breadcrumbs, patting to make sure the crumbs adhere if needed. Drizzle a little of the butter or oil over a 9x13 baking pan or rimmed baking sheet, then lay the filets in the pan. Drizzle with remaining butter or oil.


Bake near the top of the oven for 8 to 15 minutes, depending on the thickness of the fish. The fish will be crisp on the outside and tender and opaque when done. Serve immediately with lemon or other condiments as desired.

Friday, November 30, 2012

Turkey Bone Gumbo

Here's what I'm making this weekend. I've got the stock made and the turkey reserved. Now I've just got to get the time to put the whole thing together which should happen this weekend. For those who've forgotten or never tried Turkey Bone Gumbo I thought I'd repost it since our family loves it so.

-------------

After I reviewed Gumbo Tales, Sara Roahen very graciously emailed me some recipes. The Turkey Bone Gumbo had caught my eye and I made it after Thanksgiving. Oooo, now that was some good gumbo! So savory, so rich.

However, I didn't want to go spreading her recipes around. Then I recently finished Cooking Up a Storm: Recipes Lost and Found from the Times-Picayune of New Orleans. An excellent look at the basic cooking of New Orleans, it also had a recipe for Turkey Bone Gumbo that is very similar to Sara Roahen's. I now felt ok about putting the recipe out there. What follows is a combination of her recipe and of the one from Cooking Up a Storm.

The difference is that both recipes recommend saving any turkey meat from the carcass used for making broth and then to include it in the gumbo. I tried this, against my better judgment, which I am sorry to say was confirmed. After simmering for so long, the only thing that the salvaged turkey meat resembles is wood chips. Just save regular turkey meat (forgo a sandwich or two) and don't worry about recovering those bits of turkey from the cooked carcass. They will make the broth all the richer and you can toss them out without worry.

Roux making is not nearly as scary as you might think from reading recipes for it. Also, more important than anything else is keeping an eye on the color and keeping it from burning. My stove must cook hotter than either Roahen's or the recipe contributor from Cooking Up a Storm. I had roux ready in 10-15 minutes.

This is definitely a good reason to cook a turkey. I might have to do that this weekend ... my mouth is watering thinking of this gumbo.

For the stock
Step 1
1 turkey carcass
2 yellow onions, chopped
3 stalks celery, chopped
2-4 bay leaves
1 tablespoon black peppercorns
1 gallon water, or enough to cover carcass

Combine all ingredients in a big pot, bring to a boil and then lower heat, simmering uncovered for about two hours. Skim off any foam that rises to the surface. Drain the stock, reserving all liquid. Discard all solids.

For the gumbo

Step 1
1 cup vegetable oil
1-1/4 cups flour

In a large cast-iron pot or enameled cast-iron Dutch oven, heat the oil over medium-high heat. Whisk in flour and continue to stir constantly—either with a whisk or a wooden spoon. Cook for 20-25 minutes to make a dark brown roux, the color of chocolate. If you sense that your roux is in danger of burning, reduce the heat immediately and continue to stir.

Step 2
1-1/2 cups chopped yellow onion
1 cup chopped green pepper
1/2 cup chopped celery
1 teaspoon salt
1 teaspoon cayenne
1 pound andouille or smoked sausage, cut into ¼-inch cubes

Then stir in onion, bell pepper, and celery, salt, cayenne and continue to stir for about 5 minutes, until vegetables begin to wilt. Be prepared: when cold vegetables hit hot roux, they emit a cloud of steam and a loud hissing. Add sausage, and continue to cook for about 5 minutes.

Step 3
3-4 bay leaves
6 cups turkey stock
2-3 cups chopped leftover turkey meat
freshly ground black pepper to taste

Add bay leaves and stock to the pot, and bring to a boil over high heat. Reduce heat to medium low and simmer for 45 minutes. Skim off any fat that rises to the surface. Add all reserved turkey meat and continue to simmer, uncovered, for 2 hours.

Step 4
1/4 cup chopped parsley
1/4 cup chopped green onion tops
1/2 tablespoon filé powder
2 tablespoons fresh lemon juice

Add black pepper and taste; adjust seasoning. Thin out with more stock or water if necessary. Just before serving, add parsley, green onions, and lemon juice. In order to properly incorporate filé powder, mix it first with a few tablespoons of stock; stir to a smooth consistency and then add to the gumbo. Serve with white rice, and potato salad if desired. Serves 8-10.
Classic King Cake

Taste of the South photo Traditional for Mardi Gras, this is worth spending the time on.  A few years ago Taste of the South magazine publi...