This cake is from Betty Crocker's Cake Decorating. Following the tradition from when we were little, I got this book so the girls could choose whatever cake they wanted for their birthdays. Yes, I even made a Dinosaur Cake one year. It didn't look half bad either.
The great thing about Betty Crocker cookbooks is that they really have been tested well so the recipes are foolproof. This cake is the Spring Flower Cake which has Yellow Layer Cake with Lemon Butter Frosting. Between the layers I used Lemon Filling from the Umbrella Shower Cake, which was similar to a lemon pie filling and quite deliciously tart. (Quite meaning "very" in the American sense, not the British usage ... which I found out a while back when listening to CraftLit means "so so." Language use is so interesting, isn't it?)
Anyway, back to the recipe. All the above use of pieces from here and there was because I dislike White Mountain Frosting (a 7-minute boiled frosting that is similar to ... maybe melted marshmallows? ick!) which is what was called for in the Lemon Allegretti Cake that Tom chose. Also, it would have white cake layers which are all right, I suppose, but yellow are just as good and I didn't feel like separating eggs. Not a big deal, but just felt fiddly to me.
So, there you are. All that considering took me several enjoyable days as I thought about options. I knew that Tom wouldn't care as long as he had a lemon cake.
The verdict?
Absolutely delicious and very lemony.
Tom said that the lemon filling was too tart on the first day but felt it had calmed down by the second day. I didn't notice any calming down but loved the tartness on both days. Perhaps his expectations were different on the second day?
The filling was rather loose and I would have added a bit more cornstarch or a bit less lemon juice perhaps so it was firmer between the layers. No matter what, make it the day before so it is cooled down in the fridge and as firm as possible.
I must also admit that I completely missed the part where I was to split the cake layers so that the cake had four layers total. I think that would have made the cake more elegant and also spread the lemon "hit" more effectively throughout the cake. Ah, well. There's always next time.
Am I right? Of course I am!
Yellow Layer Cake
2 cups all-purpose flour
1-1/2 cups sugar
1/2 cup butter, softened
1 cup milk
3-1/2 teaspoons baking powder
1 teaspoon salt
1 teaspoon vanilla
3 eggs
Heat oven to 350. Grease and flour 2 round 9" cake pans. Beat all ingredients in large bowl on medium speed, scraping bowl constantly, until blended, about 30 seconds. Beat on high speed, scraping bowl occasionally, 3 minutes. Divide batter between pans.
Bake until wooden pick inserted in center comes out clean, 30-35 minutes. Cool 10 minutes; remove from pans. Cool completely.
Lemon Filling
3/4 cup sugar
3 tablespoons cornstarch
1/4 teaspoon salt
3/4 cup water
1 teaspoon finely shredded lemon peel
1 tablespoon butter
1/3 cup lemon juice
2 drops yellow food color (I didn't use this)
Mix sugar, cornstarch, and salt in saucepan. Stir in water gradually. cook, stirring constantly, until mixture thickens and boils. Boil and stir 5 minutes. Remove from heat; add lemon peel and butter. Stir in lemon juice and food color; cool. If filing is too soft, refrigerate until set.
Lemon Butter Frosting
6 cups powdered sugar
1-1/2 cups butter, softened
1/4 cup lemon juice
Beat all ingredients on high speed until frosting is smooth and spreading consistency. If necessary, stir in additional lemon juice, 1 teaspoon at a time.
Note: I downsized this since the recipe is to also fill a cake. I used 4 cups powdered sugar, 1 cup butter, and 3 tablespoons lemon juice. If you plan on decorating cake then you may want to make the entire amount.
To Assemble
Split cake to make 4 layers.
Fill layers with Lemon Filling.
Frost cake with Lemon Butter Frosting. If decorating, put extra frosting into cake decorating tube and swirl away!
Tuesday, May 11, 2010

Thursday, April 29, 2010
Listen My Children and You Shall Hear of a Colonial Drink That Brings Good Cheer: Raspberry Rum Shrub
Shrub?
Isn't that a bush?
Yes, unless you are talking about a refreshing drink from before sodas were the order of the day.
Slow Food USA tells us:
Ah ha!
Suddenly a shrub beverage was recategorized mentally and I was interested. Especially when considering it as something that would stand up to dark rum.
This was an easy recipe and yielded a lot of syrup. Felten points out, for those who do not want to make the syrup or who want different flavors, that Tait Farm Foods provides ready made shrub syrups in many flavors. They also have recipe booklets I noticed when stopping by their website which may come in handy when trying to figure out what to do with all this Raspberry Shrub syrup. Although, honestly, I like its flavor so well I can dip it out on a spoon. Mmmmm....
I might add here that the Raspberry Rum Shrub, which we made with ginger ale, got two thumbs up.
Here's the recipe for those who want to give it a try.
Raspberry Rum Shrub
1 ounce raspberry shrub syrup
2 ounces dark rum
4 ounces ginger ale or soda water
Build with ice in a stemmed goblet (I used wine glasses), and stir. Garnish with fresh raspberries.
Raspberry Shrub Syrup
1 cup sugar
1 cup water
2 pints raspberries
2 cups white wine vinegar
Whisk water and sugar together at a boil. Reduce heat for a few minutes and add raspberries, stirring occasionally, for 10 minutes. Add vinegar and bring to a boil for 2 minutes. Strain, cool, and bottle. Keep refrigerated (even if the Founding Shrubbers didn't).
(Recipe courtesy of Walter Staib, Chef of Philadelphia's City Taverns.)
Isn't that a bush?
Yes, unless you are talking about a refreshing drink from before sodas were the order of the day.
Slow Food USA tells us:
Shrub is a colonial-day drink whose name is derived from the Arabic word sharab, to drink. It is a concentrated syrup made from fruit, vinegar, and sugar that is traditionally mixed with water to create a refreshing drink that is simultaneously tart and sweet. In the nineteenth-century, the drink was often spiked brandy or rum. Ubiquitous in colonial times, the use of shrubs as a flavoring for tonic and sodas subsided with increasing industrial production of foods.Reading Eric Felton's entertaining and informative book, How's Your Drink?: Cocktails, Culture, and the Art of Drinking Well, I came across his recipe for a Raspberry Rum Shrub. I remembered having seen similar recipes as curiosities in old cookbooks and the vinegar was offputting to my mental palate. Until, that is, I remembered lemonade with its sweet-tart combination that was diluted by water and ice to make a refreshing summer drink.
Ah ha!
Suddenly a shrub beverage was recategorized mentally and I was interested. Especially when considering it as something that would stand up to dark rum.
This was an easy recipe and yielded a lot of syrup. Felten points out, for those who do not want to make the syrup or who want different flavors, that Tait Farm Foods provides ready made shrub syrups in many flavors. They also have recipe booklets I noticed when stopping by their website which may come in handy when trying to figure out what to do with all this Raspberry Shrub syrup. Although, honestly, I like its flavor so well I can dip it out on a spoon. Mmmmm....
I might add here that the Raspberry Rum Shrub, which we made with ginger ale, got two thumbs up.
Here's the recipe for those who want to give it a try.
Raspberry Rum Shrub
1 ounce raspberry shrub syrup
2 ounces dark rum
4 ounces ginger ale or soda water
Build with ice in a stemmed goblet (I used wine glasses), and stir. Garnish with fresh raspberries.
Raspberry Shrub Syrup
1 cup sugar
1 cup water
2 pints raspberries
2 cups white wine vinegar
Whisk water and sugar together at a boil. Reduce heat for a few minutes and add raspberries, stirring occasionally, for 10 minutes. Add vinegar and bring to a boil for 2 minutes. Strain, cool, and bottle. Keep refrigerated (even if the Founding Shrubbers didn't).
(Recipe courtesy of Walter Staib, Chef of Philadelphia's City Taverns.)
Friday, April 16, 2010
Lomo de Cerdo en Chile Verde (Loin of Pork in Green Chile Sauce)
My mother had been asking if I had Dad's green pork recipe copied down. Sadly no, but I am sure it's genesis was in Elisabeth Ortiz's original The Complete Book of Mexican Cooking. This is from waaay back in the day ... wait for it ... 1967. Yet it is fascinating to look at how authentic the results were that Ortiz communicated in her recipes using canned tomatillos and jalapenos. In fact, looking up the recipe, I was seized with the desire for green pork and also seized with curiosity about making it old-school Ortiz style.
I remembered when I was in the store and saw a pork roast on sale. Then I ran all over the store picking up the ingredients. Turns out this is not actually the recipe my parents favored. (They used the recipe under this one which I may actually get around to sharing one of these days.)
This was absolutely delicious. We scooped it into flour tortillas. Mmmmm ...
These days pork is not what it was then and I'd use a pork shoulder, though my roast did very well. Also, my ... ahem ... handful of cilantro is actually an entire bunch. What can I say? I'm a fan.
Elisabeth Lambert Ortiz did update her book (The New Complete Book of Mexican Cooking) and making this recipe made me curious as I am sure she now uses fresh tomatillos and the like. I have requested it from the library.
Lomo de Cerdo en Chile Verde
Loin of Pork in Green Chile Sauce
2 tablespoons lard or oil
1 large onion, finely chopped
2 cloves garlic, chopped
3 pounds boneless loin of pork, cut into 2-inch cubes
2 pounds tomatillos, shucked, washed, and cut into quarters
Handful of fresh cilantro, chopped
2-3 mild jalapenos, cut into strips
Salt
Freshly ground pepper
Heat the lard or oil in a skillet, and saute the onion and garlic until limp. Drain, and place in the bottom of a heavy, flame-proof casserole that has a cover. Add the pork, tomatillo, cilantro, and chiles, and the nopalitos. Sprinkle with salt and pepper. Cover; and simmer over a low heat until the pork can be pierced easily with a fork, or about 2 hours. Serves 6.
I usually make this the day after Christmas when I have lots of roast pork shoulder leftovers. In that case, simmer the sauce for an hour and then add the cut up pork and simmer for another hour.
Thursday, March 25, 2010
Cream Filled Oat Bars
I really can't believe I never shared this cookie recipe before now. What brought it to mind was reading The Pioneer Woman's recipe for the same things. Hers have a different name and the recipe is slightly different but I'd bet they taste the same. They sure look the same. I'd show you her photo but I know she worked hard on photographing these and the process. Click through and see.
I wasn't sure where I got this recipe, but I see the exact match from Betty Crocker.
So simple and if you love lemon, you're gonna love these.
Cream Filled Oat Bars
Step 1: Filling
14 ounces condensed milk
2 teaspoons grated lemon rind
1/4 cup lemon juice
Mix until thickened. Reserve.
Step 2: Crust
1-1/4 cups flour
1 cup quick or old-fashioned oats
1/2 cup brown sugar
1/2 cup butter, softened
1/4 teaspoon salt
1/4 teaspoon baking soda
Mix until crumbly. Press half in greased 8” square pan. Bake 10 minutes at 375°.
Spread filling over baked layer. Sprinkle remaining crumbs on top. Press gently into filling.
Bake 20 minutes until center is set but soft. Cool completely. 20 bars.
I wasn't sure where I got this recipe, but I see the exact match from Betty Crocker.
So simple and if you love lemon, you're gonna love these.
Cream Filled Oat Bars
Step 1: Filling
14 ounces condensed milk
2 teaspoons grated lemon rind
1/4 cup lemon juice
Mix until thickened. Reserve.
Step 2: Crust
1-1/4 cups flour
1 cup quick or old-fashioned oats
1/2 cup brown sugar
1/2 cup butter, softened
1/4 teaspoon salt
1/4 teaspoon baking soda
Mix until crumbly. Press half in greased 8” square pan. Bake 10 minutes at 375°.
Spread filling over baked layer. Sprinkle remaining crumbs on top. Press gently into filling.
Bake 20 minutes until center is set but soft. Cool completely. 20 bars.
Thursday, March 18, 2010
Wednesday, March 03, 2010
CSA! CSA!
(That's Community Supported Agriculture to you and me.)
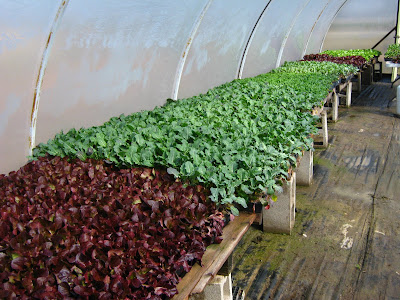
I still remember the first time I read about CSAs many years ago. The idea of purchasing a share or subscription of a farm's produce and in return receiving a box of seasonal, locally grown produce each week throughout the growing season was so appealing.
I looked in vain, off and on, for such a set up in the Dallas area until a few weeks ago when I happened across a notice on the Dallas Morning News food blog pointing me to this notice that a local farmer was looking for subscribers for a CSA he was beginning.

Exciting? Oh yeah! They are even providing blueberries. Blueberries! I wasted no time but signed up online and sent in my check that very day. I later received notice that I was in. Woohoo!
I just got an email that sets up the pick up schedule and talks about the effects of our wacky weather on the planting. Somehow I didn't stop to think about the fact that I now will feel more connected to our weather just because I now know it will have a direct effect on the farm which I am now helping support. I like that though. Reading the email suddenly took me back to the days when my parents had a gigantic vegetable garden (GIGANTIC) that we weeded all summer long.
 Photos of our future produce pickups (fingers crossed for good weather).

I still remember the first time I read about CSAs many years ago. The idea of purchasing a share or subscription of a farm's produce and in return receiving a box of seasonal, locally grown produce each week throughout the growing season was so appealing.
I looked in vain, off and on, for such a set up in the Dallas area until a few weeks ago when I happened across a notice on the Dallas Morning News food blog pointing me to this notice that a local farmer was looking for subscribers for a CSA he was beginning.

Exciting? Oh yeah! They are even providing blueberries. Blueberries!
You will receive 6-15 different fruits and vegetables each week. All fruit and vegetables will be grown here on our farm (we may have to supplement our certified organic blueberries by picking from another blueberry farm close to us where absolutely no pesticides are used. Our blueberry bushes are still only 4 years old.) This supply will include 2 pints of blueberries each week plus one full flat (12 pints) during blueberry season. We will be planting peach, pear, plum, and apple trees for future fruit harvest.
 I wasted no time but signed up online and sent in my check that very day. I later received notice that I was in. Woohoo!
I just got an email that sets up the pick up schedule and talks about the effects of our wacky weather on the planting. Somehow I didn't stop to think about the fact that I now will feel more connected to our weather just because I now know it will have a direct effect on the farm which I am now helping support. I like that though. Reading the email suddenly took me back to the days when my parents had a gigantic vegetable garden (GIGANTIC) that we weeded all summer long.
... have been so busy trying to finish all the spring transplanting from the small plug trays into the 2 inch cups, finishing onion planting in the fields "on mud beds", planting eggplant seeds, the 8 varieties of pepper seeds (5 heirloom varieties) and tomato seeds (one heirloom variety) in the small plug trays on warmer beds in the greenhouses. It is already time to begin planting squash, cucumber, watermelon, cantaloupe, Israel melon, and zucchini seeds in the greenhouses.Yep, we're going to have a connection to nature that I haven't experienced in some time, even though it will be vicarious. As well, I am going to be forced to vary our diet and try new varieties of fruit and vegetables ... also all to the good. I'm excited about this.
 Photos of our future produce pickups (fingers crossed for good weather).
Wednesday, January 20, 2010
Easy Smoked Brisket
This is one of Matt Martinez's shortcuts to achieving authentic flavor with less than usual work. I know that when I have used this technique it is universally acclaimed as delicious. It could hardly be any easier. I can't remember which of Martinez's cookbooks this came from at the moment but they are all very good.
Smoked Brisket
8-12 pound short, fat beef brisket
Wood chips soaked for 1 hour
Season untrimmed brisket if desired.
Prepare charcoal grill so that charcoal is ash white. Place wood chips on coals. Grill until dark and crusty on both sides, 30-40 minutes, turning occasionally. Expect flare-ups, but allow meat to char.
Bake in oven on a rack, covered, at 300° or 350° for 30-45 minutes per pound.
Smoked Brisket
8-12 pound short, fat beef brisket
Wood chips soaked for 1 hour
Season untrimmed brisket if desired.
Prepare charcoal grill so that charcoal is ash white. Place wood chips on coals. Grill until dark and crusty on both sides, 30-40 minutes, turning occasionally. Expect flare-ups, but allow meat to char.
Bake in oven on a rack, covered, at 300° or 350° for 30-45 minutes per pound.
Monday, January 18, 2010
$10 Wine Hall of Fame
For those who were intrigued by my review of The Wine Trials 2010 which focuses on inexpensive but delicious wines ... my friend Web has a heads-up to The Wine Curmudgeon's 2010 $10 Hall of Fame. Looks intriguing.
Tuesday, January 12, 2010
Nil By Mouth
When Roger Ebert underwent surgery for his thyroid cancer, no one mentioned the possible side effects ... such as not being able to eat, drink, or speak. Most of us are aware that he can't speak but not so many knew about him being able to take no sustenance by mouth. He writes interestingly and also movingly here about not being able to eat or drink.
When it comes to food, I don't have a gourmet's memory. I remember the kinds of foods I was raised to love. Chaz and I stayed once at Les Pres d'Eugenie, the inn of the famous Michel Guerard in Eugénie-les-Bains. We had certainly the best meal I have ever been served. I remember that, the room, the people at the other tables and our view in the photo, but I can no longer remember what I ate. It isn't hard-wired into my memory.
Yet I could if I wanted to right now close my eyes and re-experience an entire meal at Steak 'n Shake, bite by bite in proper sequence, because I always ordered the same items and ate them according to the same ritual. It is there for me.
Why We Serve Champagne Year-Round: Reviewing "The Wine Trials 2010"
Several years ago one of my sisters-in-law introduced me to Domaine Ste. Michelle Cuvee Brut. It tasted delicious but, amazingly, cost only about $7.00 at that time. I began stocking it regularly since I'm a firm believer that champagne goes with everything and that everyone likes champagne. Plus it is so very festive and makes people feel extra special. This is a win-win. Gradually the price has risen to about $9 (less on sale) but there is no denying that it remains a fantastic deal and a delicious bottle of sparkling wine.
Hence, you can understand my glee and the necessity of reading Tom the first three paragraphs of the latest review book I received, The Wine Trials 2010: The World's Bestselling Guide to Inexpensive Wines, with the 150 Winning Wines Under $15 from the Latest Vintages. (Yes, a long title, but you are never left in doubt as to what the book offers.)
The first few chapters talk about wine critics, marketing, actual cost versus perceived values and such things. I was much more interested in the last part of the book which contains the 150 wines under $15 that beat bottles costing over $50 in brown-bag blind testings. Each has its own page, complete with a photo of the bottle, which discusses:
Note: as I mentioned this is a review book. I'd recommend it even if I bought it myself.
Hence, you can understand my glee and the necessity of reading Tom the first three paragraphs of the latest review book I received, The Wine Trials 2010: The World's Bestselling Guide to Inexpensive Wines, with the 150 Winning Wines Under $15 from the Latest Vintages. (Yes, a long title, but you are never left in doubt as to what the book offers.)
Dom Perignon, a $150 Champagne from France, and Domaine St. Michelle Cuvee Brut, a $12 sparkling wine from Washington State, are both made in the traditional Champagne method. Both wines are widely available at wine stores, liquor stores, and restaurants. Both are dry, with high acidity. The two bottle are more or less the same size and shape. So why are consumers willing to pay more than 12 times more for one than for the other?Of course, I feel even more justified than before. Add in the fact that I feel I am splurging if I spend $15 on a bottle of wine and you can see that The Wine Trials is clearly a book to which I was receptive.
The most obvious explanation would be that, to most wine drinkers. the liquid inside the bottle of Dom Perignon tastes better than the liquid inside the bottle of Domaine St. Michelle -- if not 12 times better, then at least somewhat better. However, that doesn't seem to be the case. Between fall 2007 and spring 2008, we conducted an experiment serving these two sparkling wines head-to-head in five different blind tastings, with the bottles hidden inside brown paper bags. And 41 of 62 tasters -- about two thirds -- preferred the Domaine St. Michelle.
In October 2009, we replicated the experiment on a smaller scale with newer releases of the two sparkling wines. This time, we served them to a group of professional chefs, certified sommeliers, and food writers, of which more than 70% preferred the humble $12 bottle to the famous $150 one. this time, we also threw in Veuve Clicquot, a popular $40 Champagne from the same luxury products group -- LVMH -- that makes Dom Perignon. More than 85% of the tasters preferred the Domaine Ste. Michelle to the Veuve.
The first few chapters talk about wine critics, marketing, actual cost versus perceived values and such things. I was much more interested in the last part of the book which contains the 150 wines under $15 that beat bottles costing over $50 in brown-bag blind testings. Each has its own page, complete with a photo of the bottle, which discusses:
- cost
- type (Old World or New World, white or red, heavy or light)
- country
- vintage tasted
- grapes
- drink with (what foods it accompanies best)
- website for the producer
- commentary: this is sometimes about the type of wine or grapes, sometimes about the winery, and then always segues into the wine itself
- nose (always in understandable terms)
- mouth (again always in understandable terms)
- design: a critique of the label and/or bottle. This is the iffy part to me, especially when you consider that sometimes a vineyard that has several bottles featured in the book will receive scathing remarks in one review for something which is completely glossed over or even called "cute" in the very next review. I think that a simple comment when the label is goofy is enough and they were pretty picky about labels. That is coming from someone who is pretty picky herself about graphic design ... so lighten up gang.
Note: as I mentioned this is a review book. I'd recommend it even if I bought it myself.
Saturday, January 09, 2010
Oh, Gosh!
While you're snuggled up reading on these very cold winter nights that are overtaking us, you might enjoy sipping this delicious sour which Hannah picked out to try over Christmas vacation. It is a close relation to our other favorite, the Chelsea Sidecar, as it uses the same relationship for the measurements. Think of it as a Rum Margarita. That's the impression we were left with and it was definitely enjoyed by all who tried it.
Notes:
1-1/2 ounces light rum
1-1/2 ounces Triple Sec
1 ounce lime juice
Shake with ice and strain into chilled cocktail glass. Garnish with a lemon twist.
Notes:
- We used Cointreau which is our favorite orange liqueur.
- We treat the recipe below as a double (which we then split). If you check the Chelsea Sidecar recipe you'll see that those amounts are halved and we find them perfectly adequate for one cocktail.
1-1/2 ounces light rum
1-1/2 ounces Triple Sec
1 ounce lime juice
Shake with ice and strain into chilled cocktail glass. Garnish with a lemon twist.
Subscribe to:
Posts (Atom)